 Indonesia
  Português
  Tiếng Việt
  ไทย
ไทย  العربية
  हिन्दी
  简体中文
简体中文  Nederlands
  Français
  Deutsch
  हिन्दी
  Italiano
  한국어
한국어  Melayu
  Norsk bokmål
  Русский
  Español
  Svenska
  Tamil
Tamil  Türkçe
  Zulu
Zulu
If you are looking for a simple online payment service with low fees to deposit Forex, Coin or Options, Skrill is a perfect choice. In this article, I will guide you on how to use Skrill from creating an account, recharge to account verification, etc.
What is Skrill e-wallet?
Skrill is an e-wallet offering money transfer services and online payments developed by Paysafe Group based in London, England. Paysafe is also the owner of Neteller – the brother of Skrill.
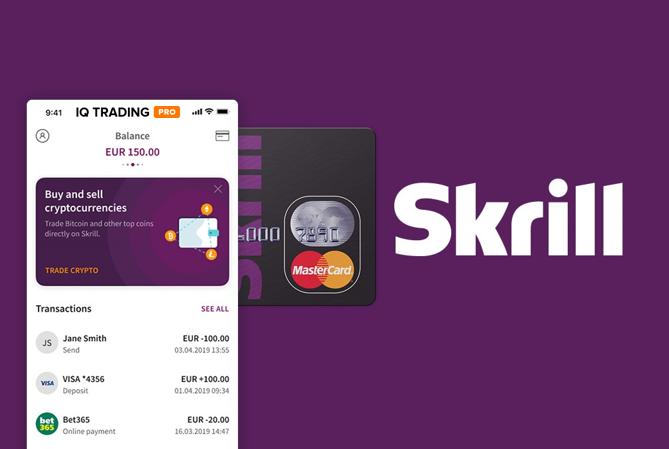
Unlike Neteller, Skrill has the fastest registration procedure available today. Just need an email address and you can sign up for one. Skrill’s account verification method is also very simple and convenient.
Link register Skrill e-wallet: https://www.skrill.com/en/
Skrill fee
Skrill is recognized to have the lowest fee in the current e-wallet market with the following fee below:
| Service | Fee |
| Deposit from bank accounts, Visa/Mastercard | 1% |
| Recharge from Neteller | 1% |
| Withdraw to bank accounts | 5.5 EUR/withdrawal |
| Withdraw money to Visa card | 7.5%/withdrawal amount |
| Money transfer | 1.45%, min 0.43 GPB |
| Currency conversion | 3.99% |
How to create a Skrill account
To register Skrill, follow these steps:
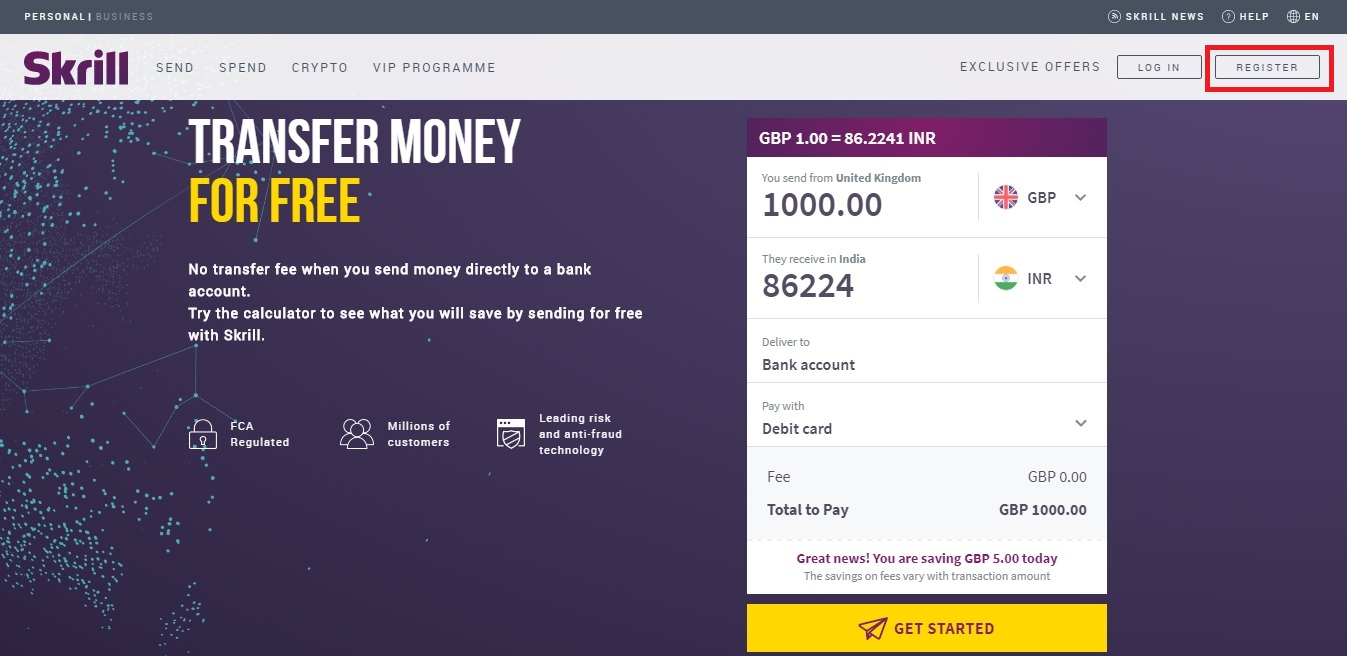
Go to the homepage https://www.skrill.com/en/
Select Register in the upper right corner or click directly here.
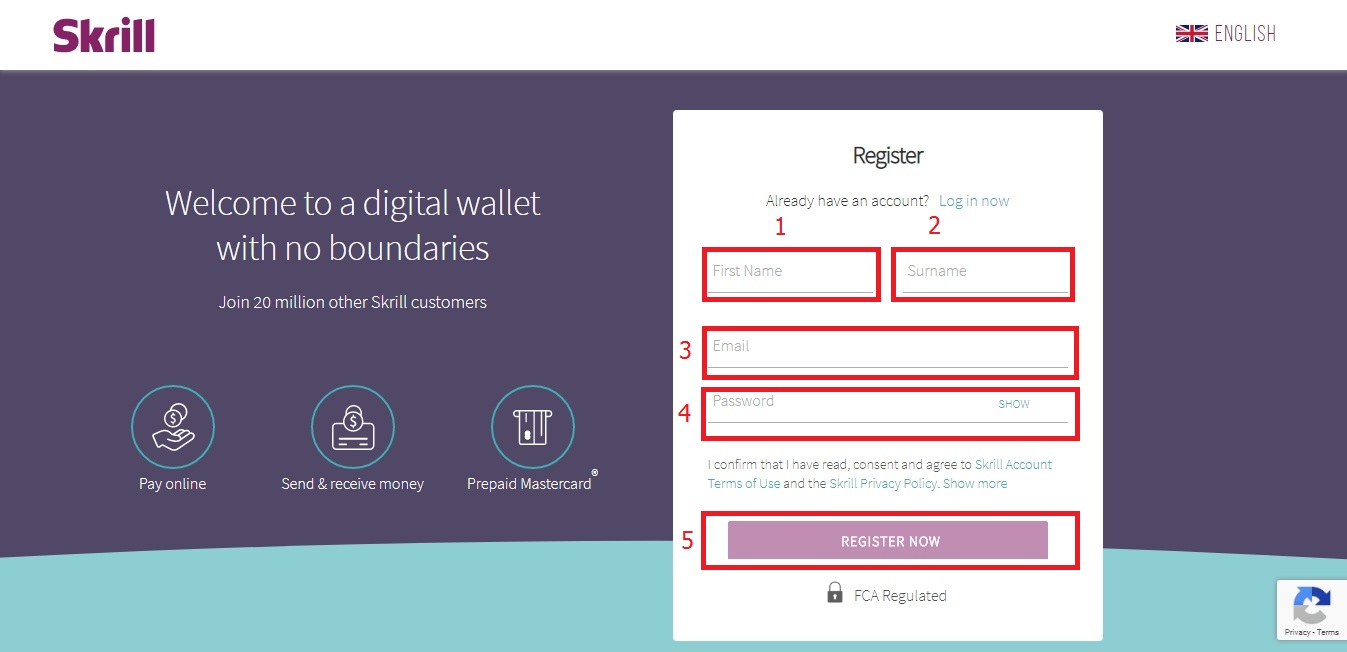
Enter your personal information
Note: This information should be the same as in your Passport, ID card or Driver’s license to verify the account successfully.
(1) Your first name.
(2) Your surname.
(3) Your Email address.
(4) Password consists of at least 8 characters, with both letters and numbers.
(5) Click Register Now to complete the registration.
Just so, the sign up for Skrill is done. As fast as the wind. However, in order to fully use Skrill’s features and increase your transaction limits, you need to verify your account.
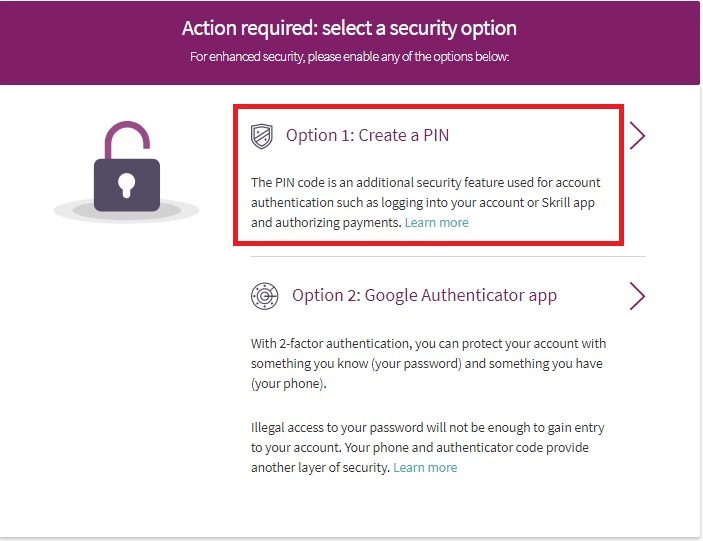
Also on the next login, Skrill will ask you to create a 6-digit PIN to secure your account and use it when trading. Click Option 1. Then enter a 6-digit PIN code. Be sure to save this code carefully to use for your following transactions.
The process to verify Skrill account
To verify Skrill account, there are 4 steps you need to take:
(1) Deposit – (2) Link to Facebook account (optional) – (3) Identify ID – (4) Verify address.
How to deposit Skrill
Skrill only requires you to pay a minimum amount of 1.13 USD to activate the account verification step. The deposit fee is 1% so you only need to pay gently 0.2 USD. The following guide will help you deposit to Skrill for the first time.
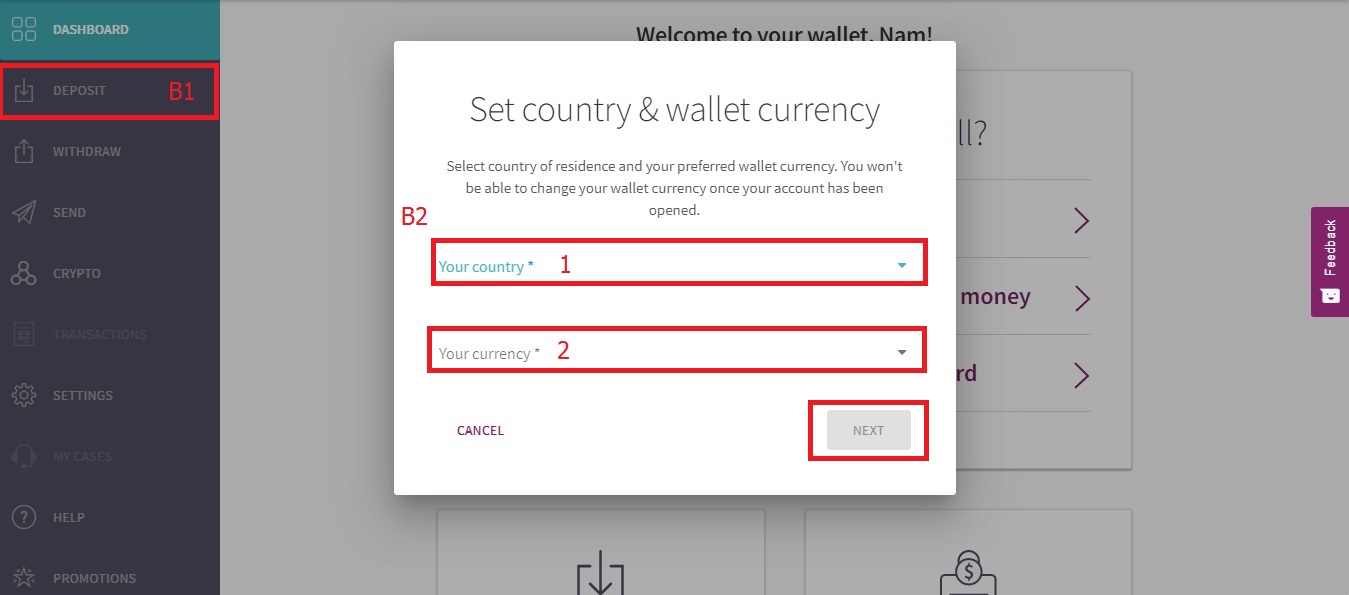
Click on the Deposit button in the left corner in the interface after logging in
Select information about Country and Currency
(1) Select Your Country.
(2) Select Your Currency.
Then click Next.
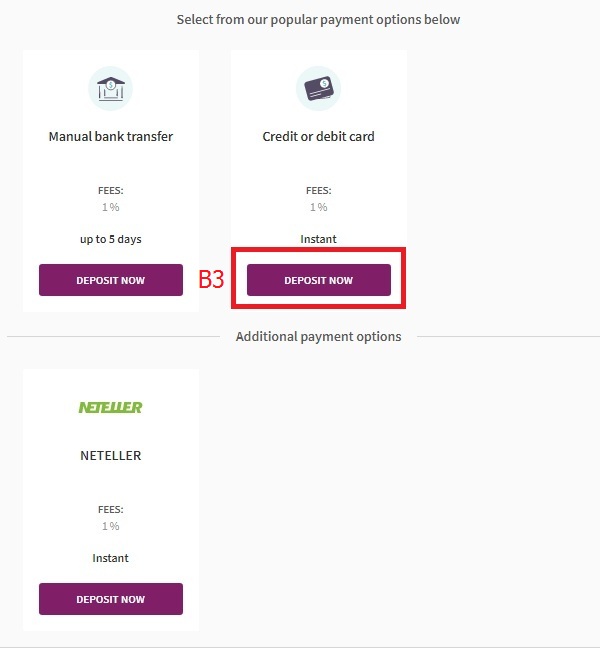
Choose one of Skrill deposit methods
Choose to deposit from Credit or Debit card so the money will be transferred to your account only after 15-20 minutes. Click the Deposit Now button as shown below.
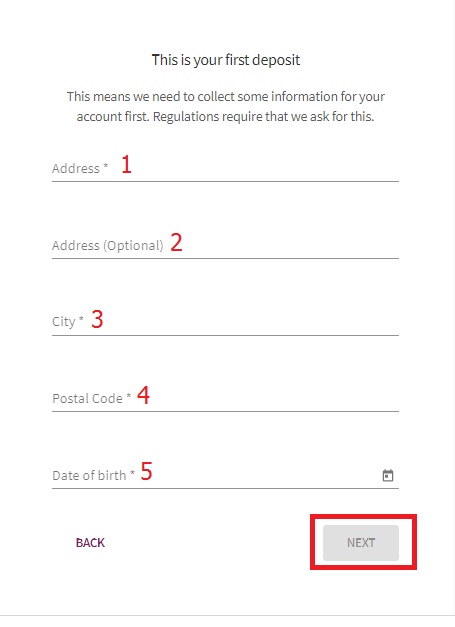
Complete the required information.
(1) Address.
Note: This must be the address you live now to use for address verification or address where you have utility bills (it must have your name and address you register in the bill)
(2) You can leave it blank.
(3) City name.
(4) Postal code of the city.
(5) Date of birth.
Then click Next.
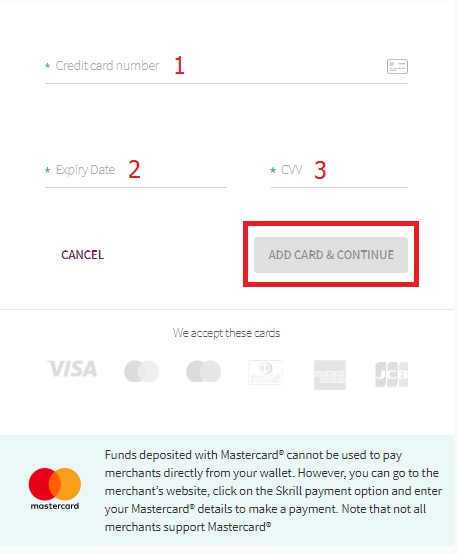
Enter your Visa/Master card information
(1) Card number.
(2) Expiry month/year.
(3) Three security numbers on the back of the card.
Click Add Cards & Continue.
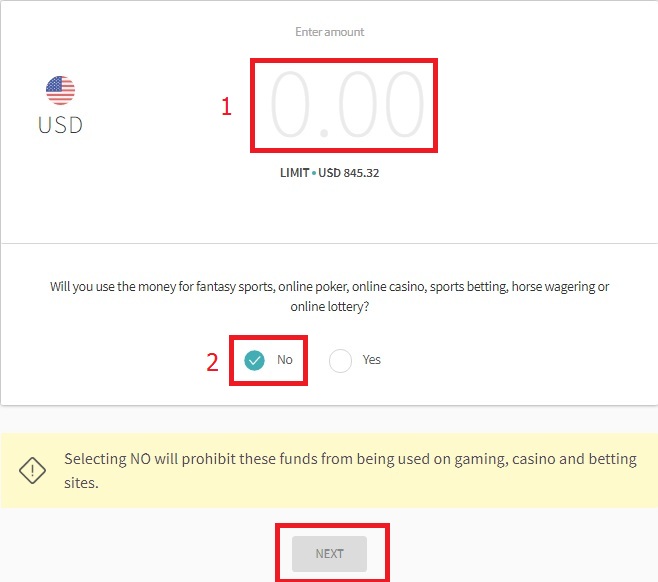
Enter the amount you want to deposit to Skrill
(1) Enter the amount (minimum of 1.13 USD).
(2) Select No if the amount you deposit is not for gambling, casino and bet.
Then click Next.
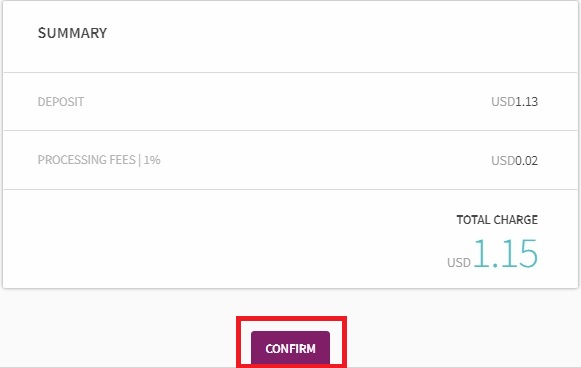
Check and confirm the amount you want to deposit
If you agree, press Confirm
At this point, you make the request to recharge from the bank you register the card such as enter the OTP code sent to the phone message or token card.
Once completed, Skrill will show a confirmation that you have deposited. Within 20 minutes, the money will be transferred to your account.
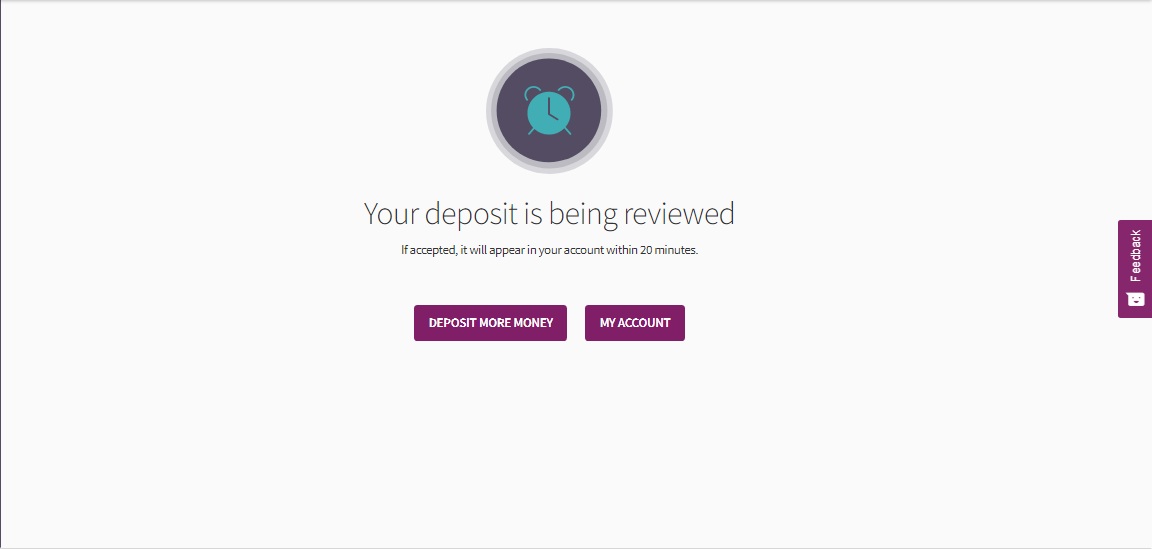
How to verify Skrill account
You don’t need to wait for the money to enter the account to start the verification. Because now Skrill’s already opened the Verification feature for your account.
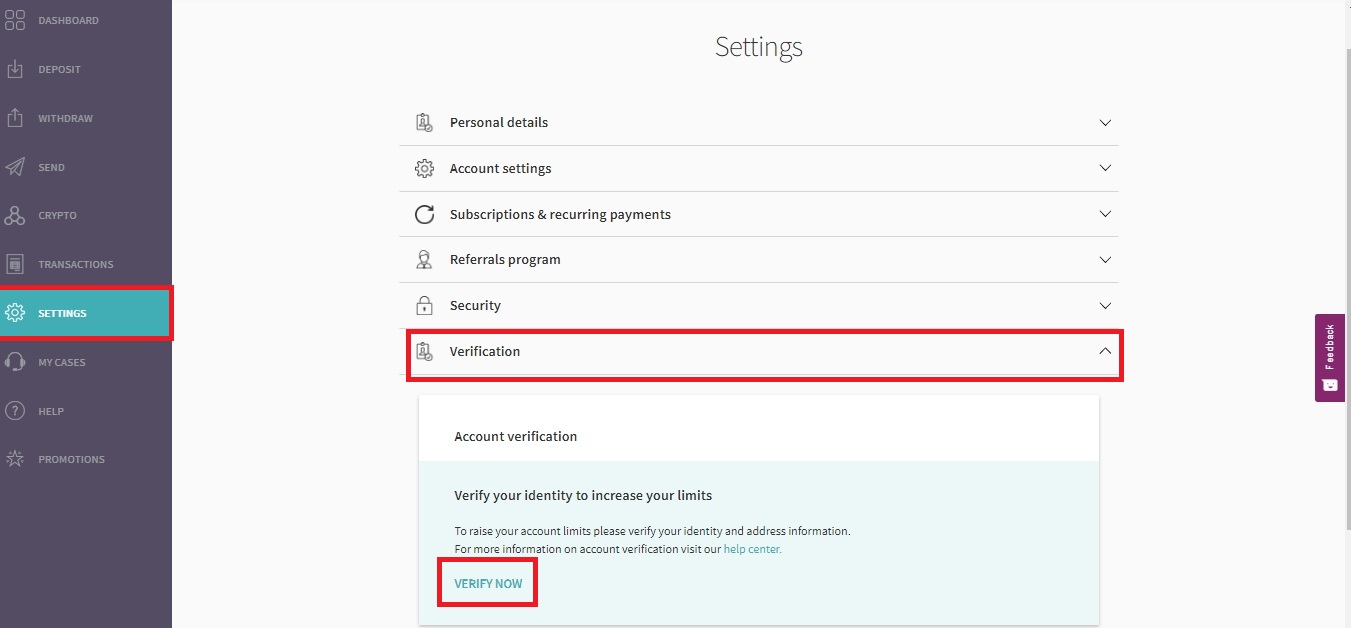
Step 1: Select Settings on the left. Click on Verification. Click Verify Now.
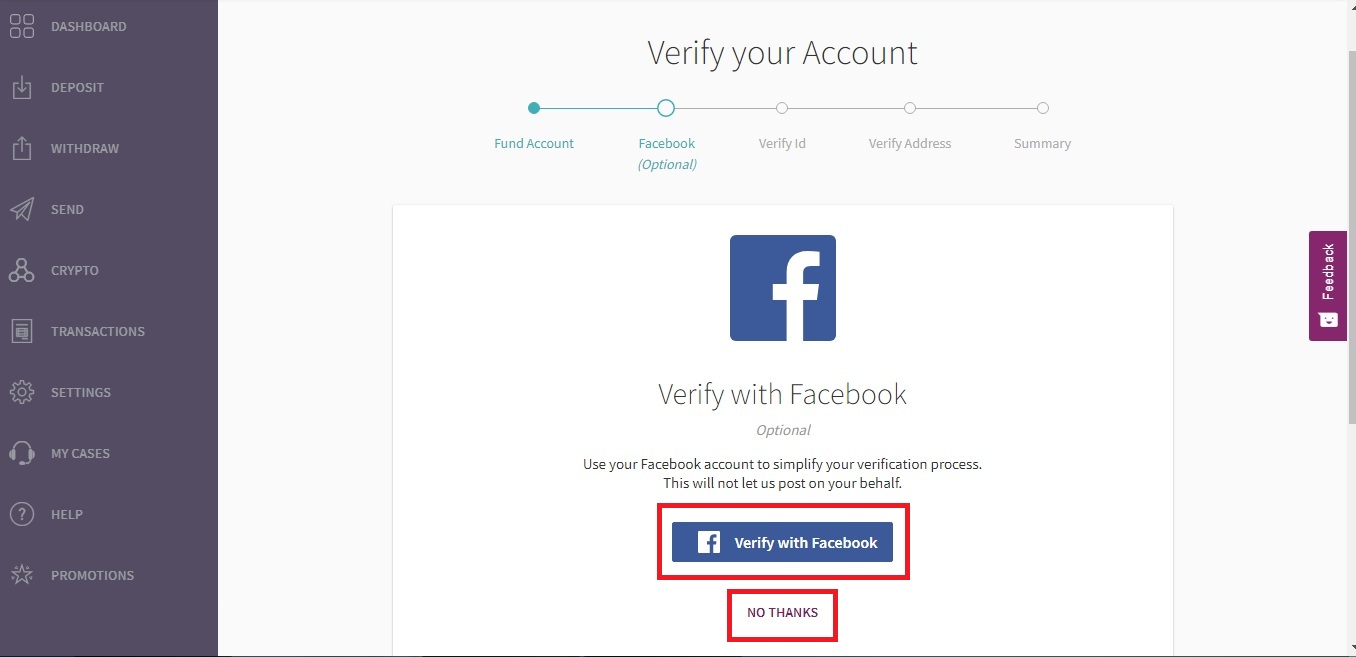
Step 2: Skrill will ask if you want to link to your Facebook account. If you agree, choose Verify with Facebook. If not, you choose No thanks. Here, I choose No thanks.
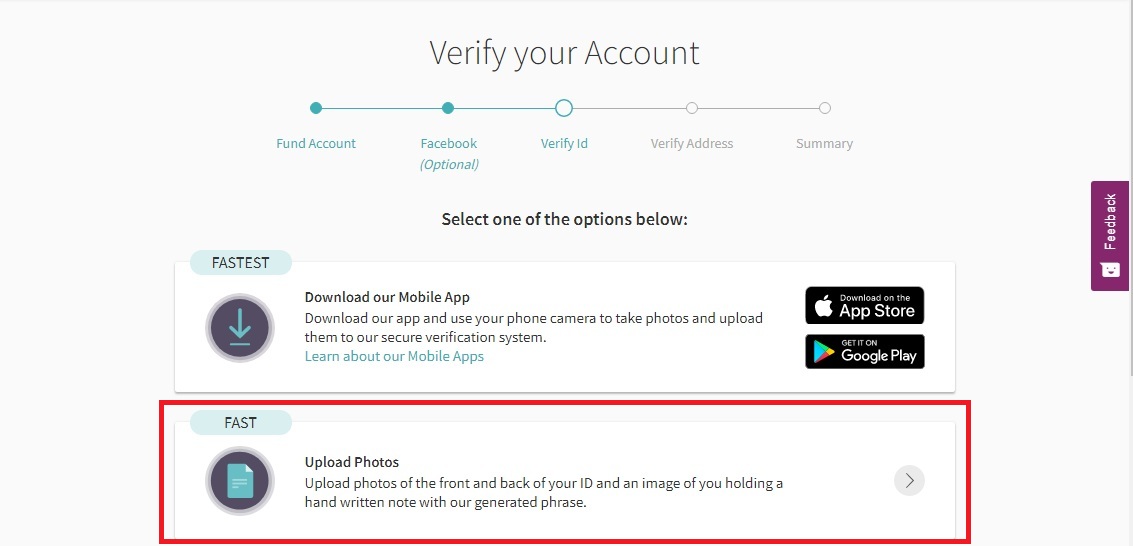
Step 3: Go to the Verify ID part. Select Upload Photos to upload Passport/ID card/Driver’s license.
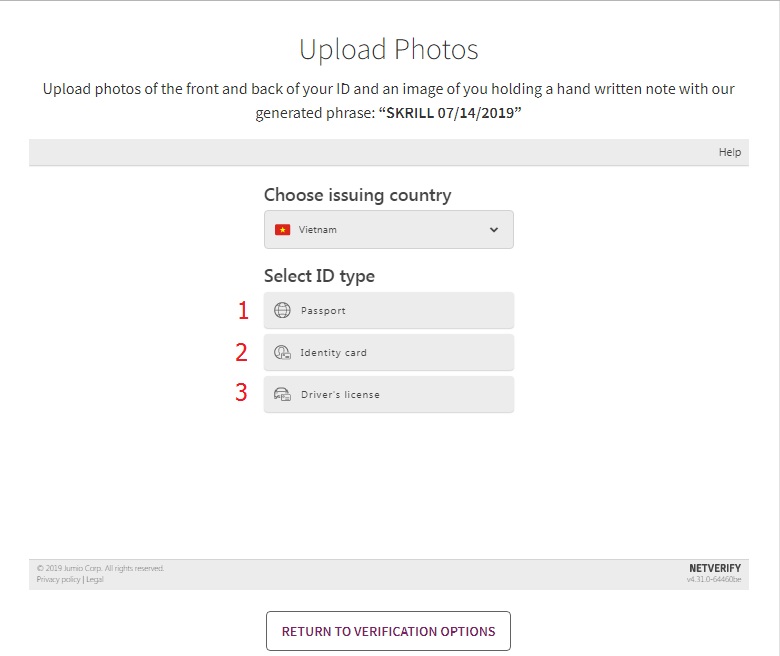
Step 4: Select the type of id you want to verify
(1) Passport.
(2) Identity card.
(3) Driver’s license.
How to verify your identity to Skrill
Step 5: Choose Take Photo to capture the image with your laptop/computer webcam. Or select Upload file to upload ID images from the computer.
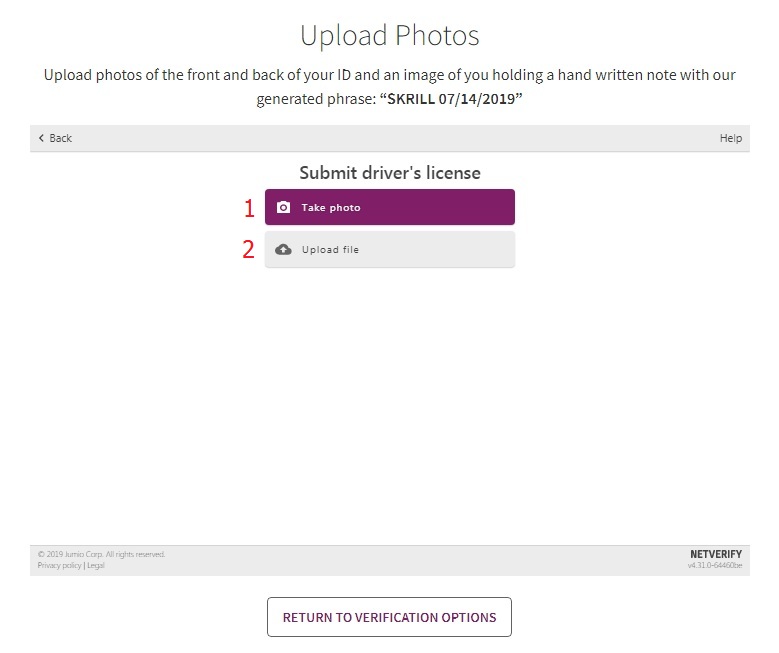
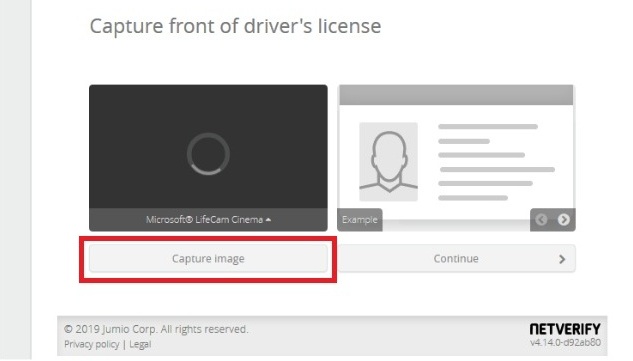
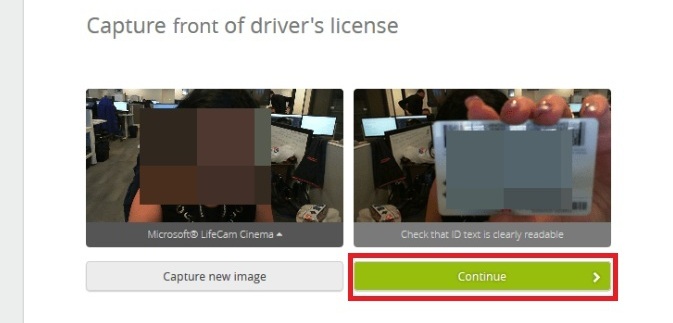
Step 6: Take/Upload the front image of your ID. Click Capture Image to take a picture. The image should be clear enough to read the information on the ID card. Then click Continue to do the same with the back.
Note: If uploading images, this must be a color photo (not a photocopy or black and white image) and saved in JPG or PNG format.
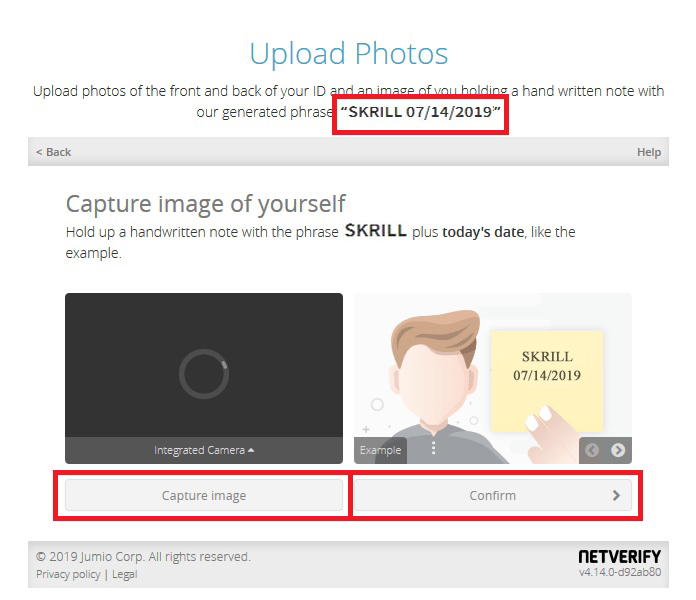
Step 7: Take/Upload the selfie image with the paper that writes SKRILL + month/day/year of today. Your face needs to be seen clearly in the photo. After completing, press Confirm.
Example: SKRILL 03.04.2018 or SKRILL 07/14/2019

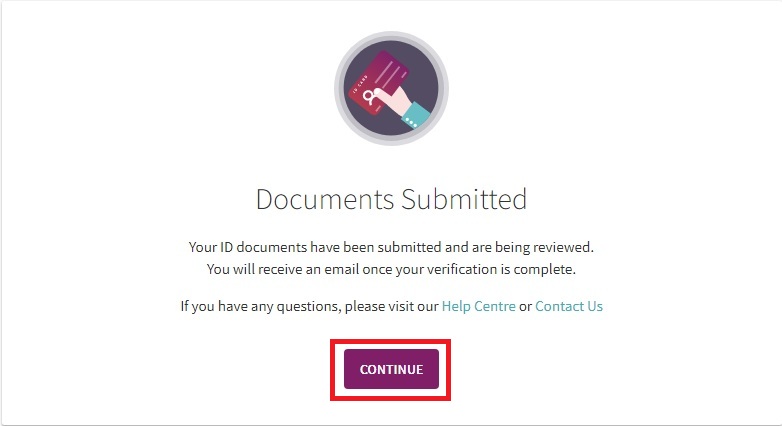
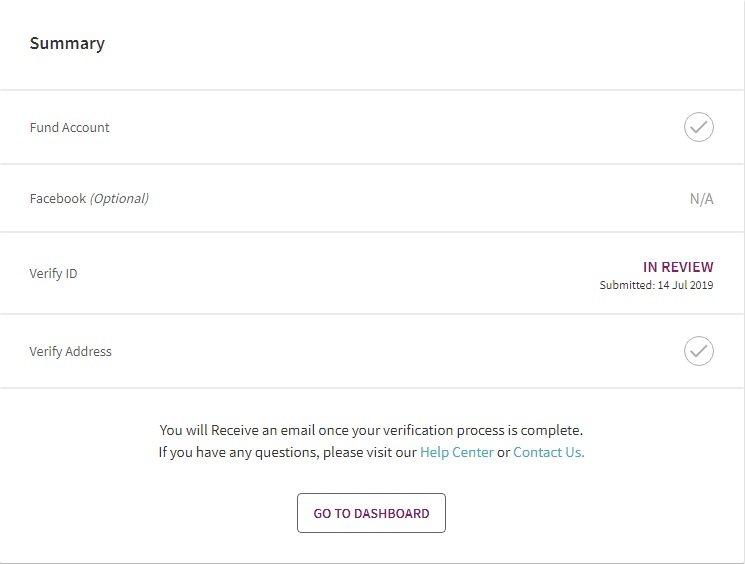
Once completed, the system will show you the confirmation of your documents submitted.
How to verify location
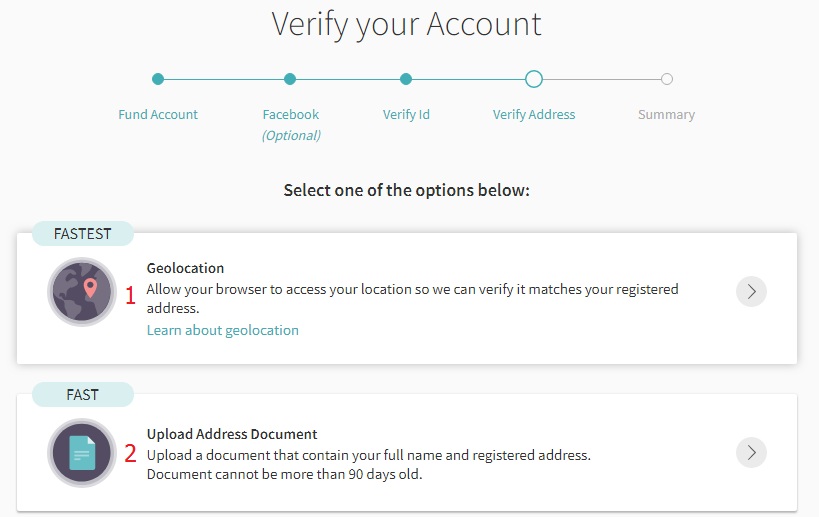
The final step is to verify the address. There are 2 ways:
(1) Geolocation: Turn on the location of the browser so that Skrill automatically locates you on Google Map. It’s very quick. But you must be using the computer/laptop near the address where you registered your account.
(2) Upload Address Document: You take photos of any documents with your full name and address that were registered for the account within the past 90 days. Examples are utility bills, bank statements, etc.
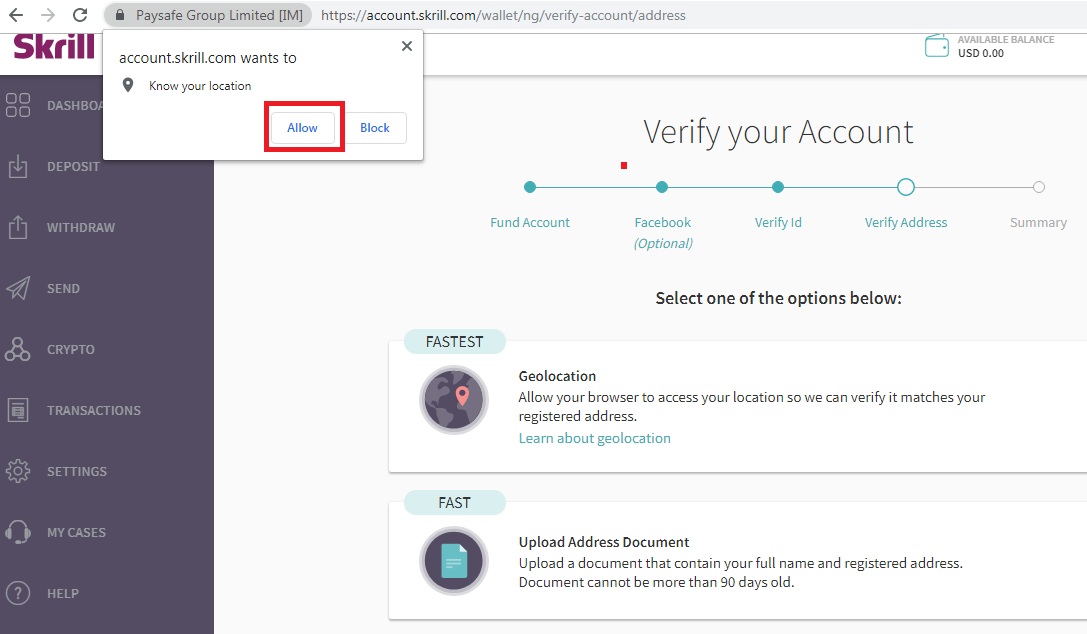
Because the second way is quite troublesome if you are not the landlord, you should use the 1st way. Click on the Geolocation. The browser will automatically display a notification in the upper left corner. Choose Allow to complete.
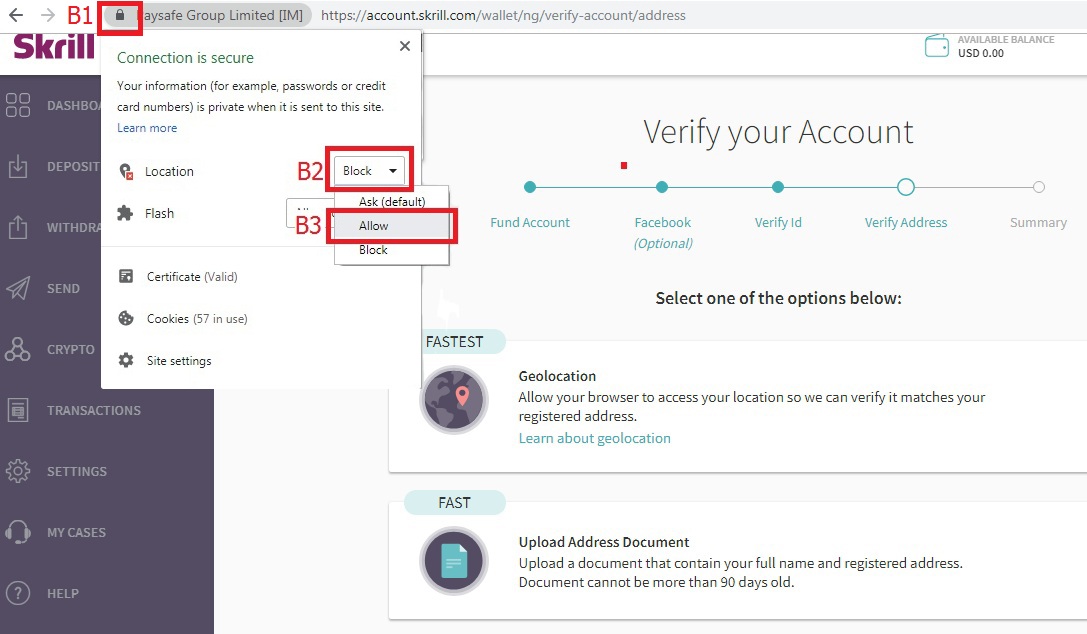
But if the browser does not automatically show this notification, follow these steps:
(1): Click on the Lock in the upper left corner of the browser.
(2): Click on the Block.
(3): Select Allow.
(4): At this time the browser will display a message asking Reload to adjust to take effect. Click Reload.
(5): Select the Geolocation again. The system will automatically verify your address.
In case the 1st way cannot be done, you need to find documents with your name and address you registered. How to take and upload the image is similar to when you take and upload ID card/Driver’s license.
Once completed, Skrill will review your account within a few days to verify. If successful, Skrill will send a notification to your email.
Thank you for reading the article How to use Skrill from A to Z. Hope you can create a Skrill account and verify it successfully. Good luck!
 Indonesia
  Português
  Tiếng Việt
  ไทย
ไทย  العربية
  हिन्दी
  简体中文
简体中文  Nederlands
  Français
  Deutsch
  हिन्दी
  Italiano
  한국어
한국어  Melayu
  Norsk bokmål
  Русский
  Español
  Svenska
  Tamil
Tamil  Türkçe
  Zulu
Zulu
